×
- Hello
- Login or Register
- Quick Links
- Live Chat
- Track Order
- Parts Availability
- RMA
- Help Center
- Contact Us
- Shop for
- Honda Parts
- Honda Accessories
My Garage
My Account
Cart
Genuine Honda Prelude Brake Master Cylinder
- Select Vehicle by Model
- Select Vehicle by VIN
Select Vehicle by Model
orMake
Model
Year
Select Vehicle by VIN
For the most accurate results, select vehicle by your VIN (Vehicle Identification Number).
15 Brake Master Cylinders found

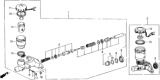
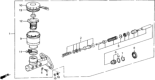
Honda Prelude Master Cylinder Assembly
Part Number: 46100-SF1-023$153.49 MSRP: $221.50You Save: $68.01 (31%)
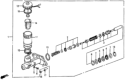
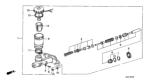
Honda Prelude Master Cylinder Assembly
Part Number: 46100-SA5-953$154.28 MSRP: $219.76You Save: $65.48 (30%)Honda Prelude Master Cylinder Assembly
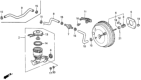
Part Number: 46100-SF1-013$153.49 MSRP: $221.50You Save: $68.01 (31%)

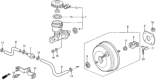
Honda Prelude Master Cylinder Assembly
Part Number: 46100-SE0-901$149.46 MSRP: $212.91You Save: $63.45 (30%)


Honda Prelude Brake Master Cylinder
The Brake Master Cylinder in Honda Prelude vehicles is used to correct the slave cylinders with the help of hydraulic pressure, and it performs the work of foot force. This system applies hydraulically based force to transfer force from the master cylinder's piston to slave cylinders amplifying the force as well as displacement. The antilock brakes on Honda Prelude vehicles installed a dual circuit master cylinder with two pistons so that if at all there is hydraulic failure in one of the circuit, there is enough pressure from the remaining circuit to halt the vehicle. A master cylinder is primarily responsible for deployments of calipers or drum brakes to create friction that is needed to stop the wheels besides actuating the Slave cylinder for clutch operation. Through the regulation of hydraulic force as well as pressure the Brake Master Cylinder plays a key role in efficient and safe operation of the vehicle's braking and clutching mechanisms.
In search of affordable OEM Honda Prelude Brake Master Cylinder? Consider browsing through our extensive inventory of genuine Honda Prelude Brake Master Cylinder. Not only do we provide market-leading prices and a manufacturer's warranty, but we also pride ourselves on exceptional customer service and swift delivery.
Honda Prelude Brake Master Cylinder Parts Questions & Experts Answers
- Q: How to safely disconnect and install the Brake Master Cylinder on Honda Prelude?A:The Honda Anti-lock Brake System (ABS) contains brake fluid under extremely high pressure within the pump, accumulator, and modulator assembly, so it is crucial to relieve system pressure before disconnecting or loosening any lines, hoses, fittings, or components to avoid severe personal injury or property damage. Honda vehicles feature a tandem brake master cylinder with one reservoir tank and two feed holes for the primary and secondary circuits. Begin by disconnecting the negative battery cable and detaching the electrical connectors from the brake master cylinder. Remove the reservoir cap and siphon out the brake fluid, taking care to avoid contact with eyes and washing hands thoroughly afterward. Use a flare nut wrench to disconnect the fluid line and unfasten the mounting nuts to remove the brake master cylinder from the Brake Booster. For installation, reverse the removal steps, fill the brake master cylinder with approved DOT 3 or DOT 4 brake fluid, and properly bleed it. If bench bleeding, secure the brake master cylinder in a vise, place a catch pan underneath, connect two short sections of Brake Line to the outlet fittings, and ensure the open ends are below the fluid level. Fill the reservoir with fresh brake fluid and pump the piston until no air bubbles appear. After disconnecting the lines, refill the brake master cylinder and securely install the cap. If the brake master cylinder is still on the vehicle, open one brake line at a time, have an assistant press the brake pedal, and then release it slowly while checking the fluid level. Repeat this for all lines until the fluid is free of air bubbles, and always lighten the line before releasing the brake pedal. Once bled, flush the area with water to neutralize any brake fluid, and if the brake master cylinder is properly bled and filled upon installation, bleeding the entire hydraulic system may not be necessary.

Related Honda Prelude Parts


Browse by Year
2001 Brake Master Cylinder 2000 Brake Master Cylinder 1999 Brake Master Cylinder 1998 Brake Master Cylinder 1997 Brake Master Cylinder 1996 Brake Master Cylinder 1995 Brake Master Cylinder 1994 Brake Master Cylinder 1993 Brake Master Cylinder 1992 Brake Master Cylinder 1991 Brake Master Cylinder 1990 Brake Master Cylinder 1989 Brake Master Cylinder 1988 Brake Master Cylinder 1987 Brake Master Cylinder 1986 Brake Master Cylinder 1985 Brake Master Cylinder 1984 Brake Master Cylinder 1983 Brake Master Cylinder 1982 Brake Master Cylinder 1981 Brake Master Cylinder 1980 Brake Master Cylinder 1979 Brake Master Cylinder