×
- Hello
- Login or Register
- Quick Links
- Live Chat
- Track Order
- Parts Availability
- RMA
- Help Center
- Contact Us
- Shop for
- Honda Parts
- Honda Accessories
My Garage
My Account
Cart
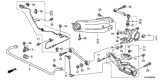
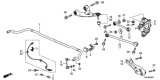
Genuine Honda Ridgeline Trailing Arm
Trailing Control Arm- Select Vehicle by Model
- Select Vehicle by VIN
Select Vehicle by Model
orMake
Model
Year
Select Vehicle by VIN
For the most accurate results, select vehicle by your VIN (Vehicle Identification Number).
4 Trailing Arms found


Honda Ridgeline Right Rear Trailing Arm
Part Number: 52371-SJC-A00$256.44 MSRP: $365.30You Save: $108.86 (30%)
Honda Ridgeline Left Rear Trailing Arm
Part Number: 52372-SJC-A00$256.44 MSRP: $365.30You Save: $108.86 (30%)


Honda Ridgeline Left Rear Arm (Upper)
Part Number: 52520-T6Z-A03$166.30 MSRP: $236.90You Save: $70.60 (30%)


Honda Ridgeline Right Rear Arm (Upper)
Part Number: 52510-T6Z-A03$166.30 MSRP: $236.90You Save: $70.60 (30%)
Honda Ridgeline Trailing Arm
The Trailing Arm in Honda Ridgeline vehicles is a part and parcel of the trailing-link suspension system, which is an independent suspension system that locomotes the axle by means of the trailing arm and a lateral control arm. The primary role of suspension system is to reduce undesirable axle movements while increasing stability and control. The Honda Ridgeline adopts trailing-arm suspension system that has at least two links and may be provide with Panhard rod to manage the lateral movement of the wheels. In the course of using the Ridgeline, Honda has employed several styles of the Trailing Arm suspension including, the semi-trailing arm. This variation has a triangular arm that rotates in two axis, and this provides flexibility and independent movement of the rear wheels. Such designs lead to enhanced cargo capacity and a lower floor thereby making the Honda Ridgeline suitable for the driver who wants both utility and comfort.
In search of affordable OEM Honda Ridgeline Trailing Arm? Consider browsing through our extensive inventory of genuine Honda Ridgeline Trailing Arm. Not only do we provide market-leading prices and a manufacturer's warranty, but we also pride ourselves on exceptional customer service and swift delivery.
Honda Ridgeline Trailing Arm Parts Questions & Experts Answers
- Q: How to remove and install a rear Steering Knuckle and rear Trailing Arm on a Honda Ridgeline?A:Loosen the rear wheel lug nuts, raise the rear of the vehicle, and support it securely on jack stands while blocking the front wheels to prevent rolling. Remove the wheel. If removing the rear knuckle, loosen the drive axle/hub nut. A special tool is necessary to separate the upper arm ball joint from the rear knuckle. Support the lower arm B with a floor jack under the coil spring pocket. Remove the lock pin from the castle nut on the ball joint stud and loosen the nut until there is a small gap. Install the ball joint separating tool, taking care not to damage the grease seal, and apply grease to the tool's contact points. Once the ball joint stud is released, remove the castle nut and separate the arm from the knuckle. Remove the upper arm-to-sub frame mounting bolt and then the arm. Installation is the reverse of removal, ensuring to tighten the ball joint stud castle nut to the lower torque figure and install a new lock pin. Raise the lower arm B to simulate normal ride height before tightening the arm-to-sub frame bolt and the wheel lug nuts. Support the lower arm B with a floor jack, remove the lower arm-to-sub frame mounting bolt and the lower arm-to-knuckle mounting nut and washer, then remove the arm from the vehicle. For installation, ensure the washer is installed correctly and raise the rear suspension to simulate normal ride height before tightening the fasteners and wheel lug nuts. Support the lower arm B under the shock/coil spring assembly pocket, remove the nuts/bolts securing the shock/coil spring assembly to the lower arm B, and detach the steering knuckle from lower arm B. Mark the toe adjuster cam's relationship to the sub frame, remove the pivot bolt/nut, and then remove lower arm B. For installation, align the marks, raise the outer end of lower arm B, and tighten the fasteners and wheel lug nuts, followed by checking the rear wheel alignment. Remove the parking brake shoe assembly, unbolt the brake hose and line brackets from the trailing arm, and support the lower arm B. Remove the trailing arm-to-knuckle bolts and the trailing arm-to-chassis mounting bolts, then remove the trailing arm. For installation, tighten all fasteners to the proper torque specifications, and check the rear wheel alignment if necessary. Remove the parking brake shoe assembly, then on 4WD models, remove the drive axle/hub nut and discard it; on 2WD models, remove the axle shaft from the hub. Unbolt the brake hose bracket from the trailing arm and the brake line bracket from the knuckle, then remove the ABS wheel speed sensor and harness from the knuckle. Support the lower arm B, detach the upper arm, lower arm A, trailing arm, and lower arm B from the knuckle. On 4WD models, carefully push the drive axle while removing the knuckle, using a puller if necessary. For installation, tighten the ball joint stud castle nut to the lower torque figure, install a new lock pin, and a new drive axle/hub nut. Raise the lower arm B and tighten the fasteners and wheel lug nuts, followed by tightening the drive axle/hub nut to the specified torque.

Browse by Year
2026 Trailing Arm 2025 Trailing Arm 2024 Trailing Arm 2023 Trailing Arm 2022 Trailing Arm 2021 Trailing Arm 2020 Trailing Arm 2019 Trailing Arm 2018 Trailing Arm 2017 Trailing Arm 2014 Trailing Arm 2013 Trailing Arm 2012 Trailing Arm 2011 Trailing Arm 2010 Trailing Arm 2009 Trailing Arm 2008 Trailing Arm 2007 Trailing Arm 2006 Trailing Arm