×
- Hello
- Login or Register
- Quick Links
- Live Chat
- Track Order
- Parts Availability
- RMA
- Help Center
- Contact Us
- Shop for
- Honda Parts
- Honda Accessories
My Garage
My Account
Cart
Genuine 1993 Honda Del Sol Crankshaft
Crank Shaft- Select Vehicle by Model
- Select Vehicle by VIN
Select Vehicle by Model
orMake
Model
Year
Select Vehicle by VIN
For the most accurate results, select vehicle by your VIN (Vehicle Identification Number).
2 Crankshafts found

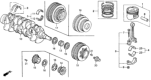
1993 Honda Del Sol Crankshaft
Part Number: 13310-PM3-010$935.82 MSRP: $1350.38You Save: $414.56 (31%)Product Specifications- Replaced by: 13300-PM3-305
- Item Weight: 28.30 Pounds
- Item Dimensions: 20.4 x 7.7 x 7.4 inches
- Condition: New
- Fitment Type: Direct Replacement
- SKU: 13310-PM3-010
- Warranty: This genuine part is guaranteed by Honda's factory warranty.
- Product Specifications
- Replaced by: 13310-P2E-010
- Item Weight: 35.40 Pounds
- Item Dimensions: 19.8 x 7.7 x 7.4 inches
- Condition: New
- Fitment Type: Direct Replacement
- SKU: 13310-PM6-010
- Warranty: This genuine part is guaranteed by Honda's factory warranty.
1993 Honda Del Sol Crankshaft
Our website is the optimal online store for when you need any genuine 1993 Honda Del Sol Crankshaft. We offer a wide range of 1993 Honda Del Sol Crankshaft at unbeatable prices. We will help provide you with a worry-free shopping experience at highly competitive prices. In addition, all OEM parts are backed by the manufacturer's warranty.
1993 Honda Del Sol Crankshaft Parts Questions & Experts Answers
- Q: How to install Crankshaft on 1993 Honda Del Sol?A: It is only assumed here that the engine block and crankshaft have been properly washed, checked and machined or rebuilt. Place the engine vertically with its bottom end upwards and unbolt the main bearing cap bridge, but do not retain any bearings in the journal. If they are, take out the original bearing inserts from block and caps, clean the bearing surfaces with a clean and lint-free cloth for maintaining their cleanliness. Clean the back sides of the new main bearing inserts and lay one in each main bearing saddle in the block, if there is a grooved insert then it has to be put in the right side. Set the corresponding bearing from each set on the main bearing cap with the tab in the recess provided. If crankshaft has been machined get oversize bearings; if standard get correct bearings by referring to the stamped codes. The flanged thrust washers should be fitted in the number four cap and saddle, the bearing faces should be cleaned and the oil holes should be checked in the crankshaft. Should the crankshaft be clean, place it in position over the main bearings and perform a check on the main bearing oil clearance following the use of Plastigage which must be placed parallel to the journal axis. Wipe the faces of the bearings in the cap bridge assembly and fit it into position but do not remove the Plastigage. Loose the assembly in three steps beginning with the middle bolts and it is important not to turn the crankshaft . After that, dismantle the assembly and compare the width of the crushed Plastigage and see the oil clearance with no influence of dirt or oil getting to the measurement. If the clearance is wrong ensure that the bearing inserts are of the right size. After that gently remove any Plastigage left on the journals and bearing faces. Remove the crankshaft, then using a file or scrape the bearing surfaces in the block, then apply a coat of fine coating of moly base grease or assembly lubricant on all the bearing surfaces together with the thrust faces. Check that the crankshaft journals are glossy before caring the crankshaft back into position, clean the bearing surface on the caps and lubricate. Attach the main bearing cap bridge assembly and the bolts and tighten the bolts starting with the center main and drilling outwards. Manually grab the crankshaft and try to rotate it to see if it binds with any of the pistons or connecting rods, then using feeler gauge or dial indicator assess the amount of crankshaft end play if it is worn or damage on the thrust faces or simply to confirm if new bearings where fitted. Replace with a new rear main oil seal.
Related 1993 Honda Del Sol Parts
 1993 Honda Del Sol Rod Bearing
 1993 Honda Del Sol Oil Pan Gasket
 1993 Honda Del Sol Oil Pump
 1993 Honda Del Sol Oil Pan
 1993 Honda Del Sol Crankshaft Thrust Washer Set
 1993 Honda Del Sol Camshaft
 1993 Honda Del Sol Crankshaft Pulley