×
- Hello
- Login or Register
- Quick Links
- Live Chat
- Track Order
- Parts Availability
- RMA
- Help Center
- Contact Us
- Shop for
- Honda Parts
- Honda Accessories
My Garage
My Account
Cart
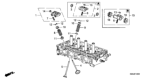
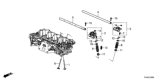
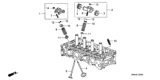
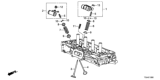
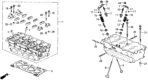
Genuine Honda CR-V Rocker Arm
Engine Rocker Arm- Select Vehicle by Model
- Select Vehicle by VIN
Select Vehicle by Model
orMake
Model
Year
Select Vehicle by VIN
For the most accurate results, select vehicle by your VIN (Vehicle Identification Number).
11 Rocker Arms found


Honda CR-V Arm Assembly, Exhuast Rocker
Part Number: 14624-RAA-A00$38.10 MSRP: $53.82You Save: $15.72 (30%)


Honda CR-V Arm Assembly, Rocker
Part Number: 14620-R44-A11$123.76 MSRP: $176.30You Save: $52.54 (30%)

Honda CR-V Arm Assembly, Exhuast Rocker
Part Number: 14624-R40-A01$90.86 MSRP: $128.33You Save: $37.47 (30%)


Honda CR-V Arm Assembly, Rocker
Part Number: 14620-R44-A10$123.76 MSRP: $176.30You Save: $52.54 (30%)

Honda CR-V Arm Assembly, Rocker
Part Number: 14620-RAA-A00$216.87 MSRP: $308.93You Save: $92.06 (30%)

Honda CR-V Arm, Assembly, Rocker
Part Number: 14620-R40-A01$407.01 MSRP: $587.32You Save: $180.31 (31%)
Honda CR-V Arm Assembly, Exhaust Rock
Part Number: 14620-5A2-A00$67.04 MSRP: $94.68You Save: $27.64 (30%)
Honda CR-V Intake Rocker Arm Assembly
Part Number: 14610-5A2-A02$138.05 MSRP: $196.65You Save: $58.60 (30%)
Honda CR-V Arm Assembly, Rocker (Vtec)
Part Number: 14620-6A0-A00$93.21 MSRP: $131.65You Save: $38.44 (30%)

Honda CR-V Rocker Arm
The Rocker Arm in Honda CR-V vehicles is also very crucial in the valvetrain system where it helps in transferring motion from the pushrod to the intake and exhaust valve. Usually made of stamped steel or aluminum the Rocker Arm rotates to translate the vertical movement of push rods into the downward movement needed to actuate the valves. High dose in diesel engines application use cast iron or forged carbon steel but aluminum is used in light duty engines due to its lightweight characteristics. There are various types of Rocker Arms, for instance roller rockers use bearings that come in the form of needles to cut down friction and wear thus improving performance in both overhead valve as well as overhead camshaft. The rocker ratio of the engine varies between 1.5:1 to 1.8:1 in the modern models of Honda CR-V and such increases the lift of the camshaft leading to greater efficiency of the engine. Fulcrum bearings are used with improved kinds in less-stressed environments of Honda CR-V engines where RPM is high.
In search of affordable OEM Honda CR-V Rocker Arm? Consider browsing through our extensive inventory of genuine Honda CR-V Rocker Arm. Not only do we provide market-leading prices and a manufacturer's warranty, but we also pride ourselves on exceptional customer service and swift delivery.
Honda CR-V Rocker Arm Parts Questions & Experts Answers
- Q: How to remove and reinstall the engine cover and rocker arm assembly on 1.8L engine on Honda CR-V?A:To also reach the other parts of the engine, one has to undo the bolts holding the engine cover and then pull it up from the Valve Cover. Further, the valve cover needs to be unplugged and it is necessary to set the number one piston at the uppermost position. Turn the rocker arm/lost motion holder bolts anti-clockwise in the recommended sequence until the tension of the spring is released and then turn them clockwise in the reverse sequence. Raising out of the rocker arm assembly, raise lost motion holder and assemblies off the rocker arm, next, raise the rocker arms and the shaft assembly out of the cylinder head. Remove the oil control orifice on the cylinder head, it is also marked that the O-ring in the lower part should be replaced after taken off. When concerning the disassembly and inspection of the rocker arm assembly, loose the bolts holding the parts and gently slid off the rocker arms, springs, collars, and the bearing caps following the relationship for reassembly purposes. Wash all parts carefully and check for signs of wear and tear: the faces and tips of the rocker arm and the surfaces of the shafts. Any shafts which are plausible, worn out or crumbling must be replaced and the oil holes should be clear. Put some engine assembly lubricant or oil on all the parts before reassembling the rocker arm to the shafts; there could be set left and right and the marks are vital. Fit a new O-ring on the oil control orifice and place it into the cylinder head; and fit the rocker arm. Lower the lost motion assemblies into the holder, fit the holder on the rocker assemblies and tighten the outer two motion holder bolts to the required torque. Loosen all rocker arm/lost motion holder mounting bolts gradually in the proper sequence to the torque indicated. Some automakers recommend reversing the procedure of removal and, at the same time, checking and adjusting the valve clearance if needed, but the final step remains the same-check for oil leaks and the general performance of the engine.

Related Honda CR-V Parts
 Honda CR-V Spool Valve
 Honda CR-V Cylinder Head Gasket
 Honda CR-V Timing Cover
 Honda CR-V Camshaft
 Honda CR-V Cylinder Head
Browse by Year
2026 Rocker Arm 2025 Rocker Arm 2024 Rocker Arm 2023 Rocker Arm 2022 Rocker Arm 2021 Rocker Arm 2020 Rocker Arm 2019 Rocker Arm 2018 Rocker Arm 2017 Rocker Arm 2016 Rocker Arm 2015 Rocker Arm 2014 Rocker Arm 2013 Rocker Arm 2012 Rocker Arm 2011 Rocker Arm 2010 Rocker Arm 2009 Rocker Arm 2008 Rocker Arm 2007 Rocker Arm 2006 Rocker Arm 2005 Rocker Arm 2004 Rocker Arm 2003 Rocker Arm 2002 Rocker Arm 2001 Rocker Arm 2000 Rocker Arm 1999 Rocker Arm 1998 Rocker Arm 1997 Rocker Arm