×
- Hello
- Login or Register
- Quick Links
- Live Chat
- Track Order
- Parts Availability
- RMA
- Help Center
- Contact Us
- Shop for
- Honda Parts
- Honda Accessories
My Garage
My Account
Cart
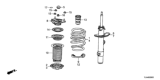
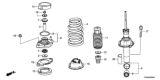
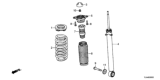
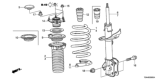
Genuine Honda CR-V Shock Absorber
Suspension Shock Absorber- Select Vehicle by Model
- Select Vehicle by VIN
Select Vehicle by Model
orMake
Model
Year
Select Vehicle by VIN
For the most accurate results, select vehicle by your VIN (Vehicle Identification Number).
114 Shock Absorbers found


Honda CR-V Shock Absorber Unit, Right Front
Part Number: 51611-TLA-A51$195.46 MSRP: $278.43You Save: $82.97 (30%)

Honda CR-V Shock Absorber Unit, Left Front
Part Number: 51621-TLA-A51$192.96 MSRP: $274.87You Save: $81.91 (30%)

Honda CR-V Shock Absorber Unit, Left Front
Part Number: 51621-TLB-A01$204.39 MSRP: $291.15You Save: $86.76 (30%)
Honda CR-V Shock Absorber Unit, Right Front
Part Number: 51611-TLB-A01$204.39 MSRP: $291.15You Save: $86.76 (30%)


Honda CR-V Rear Shock Absorber Unit
Part Number: 52611-TLA-A51$164.99 MSRP: $235.03You Save: $70.04 (30%)

Honda CR-V Rear Front Damper Unit
Part Number: 51611-T0G-A01$176.03 MSRP: $250.75You Save: $74.72 (30%)

Honda CR-V Shock Absorber Unit, Right Front
Part Number: 51605-SXS-A02$184.20 MSRP: $262.40You Save: $78.20 (30%)


Honda CR-V Rear Shock Absorber Unit
Part Number: 52611-SWA-A11$141.93 MSRP: $202.18You Save: $60.25 (30%)


Honda CR-V Rear Shock Absorber Unit
Part Number: 52611-TLB-A02$164.99 MSRP: $235.03You Save: $70.04 (30%)


Honda CR-V Shock Absorber Unit, Left Front
Part Number: 51606-S9A-A22$397.08 MSRP: $572.98You Save: $175.90 (31%)


Honda CR-V Shock Absorber Unit, Right Front
Part Number: 51605-S9A-A22$396.47 MSRP: $572.10You Save: $175.63 (31%)


Honda CR-V Shock Absorber Unit, Left Front
Part Number: 51621-T0A-A01$254.28 MSRP: $362.22You Save: $107.94 (30%)

Honda CR-V Shock Absorber Unit, Left Front
Part Number: 51606-SXS-A02$184.06 MSRP: $262.20You Save: $78.14 (30%)
Honda CR-V Shock Absorber Unit, Right Front
Part Number: 51611-TLB-A22$204.01 MSRP: $290.62You Save: $86.61 (30%)

Honda CR-V Shock Absorber Assembly, Right Front
Part Number: 51601-SWA-A05$868.05 MSRP: $1252.60You Save: $384.55 (31%)


Honda CR-V Rear Shock Absorber Unit
Part Number: 52611-TLA-A62$164.99 MSRP: $235.03You Save: $70.04 (30%)

Honda CR-V Left Front Damper Unit
Part Number: 51621-T0G-A01$186.16 MSRP: $265.18You Save: $79.02 (30%)
Honda CR-V Rear Front Damper Unit
Part Number: 51611-T0G-A91$186.43 MSRP: $265.57You Save: $79.14 (30%)
| Page 1 of 6 |Next >
1-20 of 114 Results
Honda CR-V Shock Absorber
The Honda crv Shock Absorber helps to reduce the shocks that are transferred through the suspension and also control the movements of the suspension to some extent. Hydraulic pistons are used in these dampers, which along with springs help in controlling the vibration and thus the overall comfort of the ride. Different varieties of Shock Absorber have been used on CR-V vehicle and they include twin-tube and mono-tube Shock Absorber; these are designed with specific mechanisms of the flow of the hydraulic fluid for improved operations on different driving conditions. Enhanced types such as Position Sensitive Damping (PSD) and Acceleration Sensitive Damping (ASD) tweak the Shock Absorber's actions according to certain uses, providing the most comfort and handling for Honda CR-V users.
In search of affordable OEM Honda CR-V Shock Absorber? Consider browsing through our extensive inventory of genuine Honda CR-V Shock Absorber. Not only do we provide market-leading prices and a manufacturer's warranty, but we also pride ourselves on exceptional customer service and swift delivery.
Honda CR-V Shock Absorber Parts Questions & Experts Answers
- Q: How to Install and Remove the Rear Coil Springs and Shock Absorber Assembly on a Honda CR-V?A:Before working, break loose the rear wheel lug nuts, lift the car's rear end, and keep it supported on jack stands. Also block the front wheels to prevent the car from moving. Keep the car raised with the axle lifted while holding the knuckle with a jack on the floor below. Take off the parking brake cable from its floorpan mount, disconnect the brake hose bracket, and remove the stabilizer bar link from its place on the Trailing Arm. Place the front of the trailing arm free by removing its bolts. Additionally, take out the side trim panel from the rear cargo space, lessen seat-back hardening, and let go of the floorpan bolts. First loosen and remove both shock absorber upper mounting nuts, then remove the lower mounting bolt, then take out the entire shock absorber/coil spring assembly. Look for any water or damage on the shock body, and see if the coil spring has any slashes or breaks. Go ahead and change the parts if you found something wrong. If your shocks and coil springs appear to be worn out, take time to consider all the options before beginning work, as you cannot repair these parts once they are removed. Use a vise to hold the shock and coil assembly while placing a spring compressor on top. Push the machine down to move pressure from the top of the coil spring, then release it before going back in to work. Keep track of how the upper mount fits before you take it apart. Loosen the retaining nut by gripping the shock damper rod with an Allen key, then take everything apart part by part. Reassembly means returning the spring to its correct position and using a new locking nut while installing. Assemble the shock absorber and coil spring unit into the fenderwell, push the upper mounting studs in place, but don't tighten the nuts yet. First connect the shock absorber to the trailing arm. After mounting and tightening slave arm-to-chassis bolts, lift the slave arm to normal driving height and fasten the shock absorber bottom mounting bolt. After putting the wheel and lugs on, pull the car down again. Tighten the lugs first, and then tighten the mounting nuts on top. Finish by having your car's back tire alignment tested and, if needed, fixed.

Related Honda CR-V Parts
 Honda CR-V Tie Rod End
 Honda CR-V Steering Knuckle
 Honda CR-V Coil Springs
 Honda CR-V Fender
 Honda CR-V Wheelhouse
Browse by Year
2026 Shock Absorber 2025 Shock Absorber 2024 Shock Absorber 2023 Shock Absorber 2022 Shock Absorber 2021 Shock Absorber 2020 Shock Absorber 2019 Shock Absorber 2018 Shock Absorber 2017 Shock Absorber 2016 Shock Absorber 2015 Shock Absorber 2014 Shock Absorber 2013 Shock Absorber 2012 Shock Absorber 2011 Shock Absorber 2010 Shock Absorber 2009 Shock Absorber 2008 Shock Absorber 2007 Shock Absorber 2006 Shock Absorber 2005 Shock Absorber 2004 Shock Absorber 2003 Shock Absorber 2002 Shock Absorber 2001 Shock Absorber 2000 Shock Absorber 1999 Shock Absorber 1998 Shock Absorber 1997 Shock Absorber