×
- Hello
- Login or Register
- Quick Links
- Live Chat
- Track Order
- Parts Availability
- RMA
- Help Center
- Contact Us
- Shop for
- Honda Parts
- Honda Accessories
My Garage
My Account
Cart
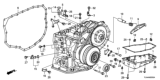
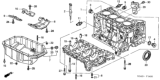
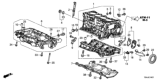
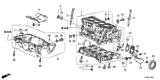
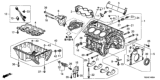
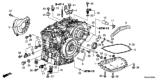
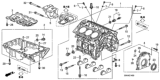
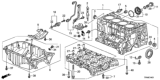
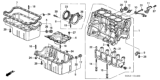
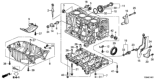
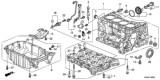
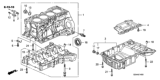
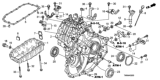
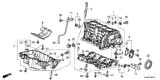
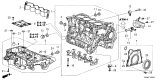
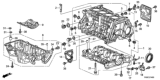
Genuine Honda Oil Pan
Oil Drain Pan- Select Vehicle by Model
- Select Vehicle by VIN
Select Vehicle by Model
orMake
Model
Year
Select Vehicle by VIN
For the most accurate results, select vehicle by your VIN (Vehicle Identification Number).
101 Oil Pans found


 Product Specifications
- Other Name: Pan, Oil; Oil Pan, Transmission Pan


 Product Specifications
- Replaces: 11200-PNL-E00, 11200-PNA-000


 Product Specifications
- Other Name: Oil Pan


 Product Specifications
- Other Name: Oil Pan


 Product Specifications
- Other Name: Pan Assembly, Oil; Oil Pan


 Product Specifications
- Other Name: Oil Pan


 Product Specifications
- Other Name: Pan, Oil; Oil Pan, Transmission Pan


 Product Specifications
- Other Name: Oil Pan


 Product Specifications
- Other Name: Oil Pan
- Replaces: 11200-RRB-A00


 Product Specifications
- Other Name: Oil Pan


 Product Specifications
- Other Name: Oil Pan


 Product Specifications
- Other Name: Oil Pan


 Product Specifications
- Other Name: Oil Pan


 Product Specifications
- Other Name: Transmission Pan


 Product Specifications
- Other Name: Pan Assembly, Oil; Oil Pan

 Product Specifications
- Other Name: Oil Pan


 Product Specifications
- Other Name: Oil Pan
- Replaces: 11200-R1A-A00, 11200-RNA-A01, 11200-RNA-A00
| Page 1 of 6 |Next >
1-20 of 101 Results
About Honda Oil Pan
In the cooling system, the oil pan plays an important role. When your Honda is not running with a rest engine, there are some oil flows down from the sides of the crankcase, and oil pans collects these oils. In other words, oil pan acts like an oil reservoir of the crankcase. The oil pan is usually made of thin steel and shaped into a deeper section. The location of the oil pan is where the oil pump is. However, after a longtime usage, the oil pan can be broken or leak, so check your oil pan in time for you and your family safety. If you find consistent oil leak in the same place under your Honda, or if you smell a smoke from engine compartment, then there is a possibility that your oil pan is in a risky condition. What you need to do next is getting a new oil pan and changing it by yourself, and you can save a lot of money in this way. What we can help you is the only first step since we offer you all Honda genuine OEM oil pan with an attractive price.
Honda Oil Pan Parts Questions & Experts Answers
- Q: How to remove and install an oil pan on 1.8L engine on Honda Civic?A:When removing the oil pan the following steps should be taken, drain the engine oil and replace the oil filter. Remove the cable with the negative identification upon the terminal of the battery Then elevate the car and place it on stands securely. Take off the splash shields underneath the engine, but before doing so for models equipped with CVT, unlock the connector to the CVT harness and now undo the exhaust pipe nuts. Subsequently, from the exhaust pipe front, cut off the front section of the exhaust pipe and take off the lower torque rod and its bracket bolts. Remove the air conditioning compressor bracket; for auto trans fwd models remove shift cable cover screws and torque converter cover screws. For the manual transmission models, therefore, the clutch cover bolts and cover need to be dismantled. Then, take out the lower two transmission mounting bolts, and the others which hold the oil pan to the block. This is done by gently striking the pan with a soft-face hammer to snap-off and then extract the dowel pin, after withdrawal of the gasket. During installation, one should use a tool known as gasket scraper to scrape off all the remnants of the old gasket and sealant in the engine block and the oil pan making sure that threaded bolt holes are free from these possessions. Immerse the oil pan in solvent, and after washing note any evidence of distortion around the location of the gasket flanges before drying it out. In case this is so, the surface of the gasket should be flattened using a hammer and a piece of wood. Another requirement is to then clean the mating surfaces between the engine block and oil pan on the Bug Eye and between the two halves of the oil pan on the Yamaha with brake system cleaner so that no oil is present on the surfaces. Remove the O-rings and apply a RTV sealant of 1/8-inch wide in the circumference of the oil pan along the inboard side of the bolt holes. In a proper orientation, fix the oil pan and tighten the bolts to the required torque with initial tightening of the bolts to finger tightness and then according to the proper torque sequence pattern. The rest of its dismantling is carried out in a backward manner to the procedure used for putting it together. The last step is to reconnect the battery, take at least an hour before you add oil and for you to check for any oil drip, start the engine.
- Q: How to remove and install an oil pan on V6 engine on Honda Accord?A:Before unbolting the oil pan, it is advisable to take off the cable of the negative terminal of the battery. Lock the rear wheels, engage park the parking brake and then lift the front part of the vehicle, placing support jacks securely. Disconnect the engine splash shield, drain the engine oil and proceed to take off the oil filter. Disconnect the exhaust crossover pipe from the warm-up catalytic converters and take the pipe away. Next, take out bolts around the perimeter of the oil pan and the oil pan to transaxle case bolts four of which are located behind the subframe, then drop the oil pan. If the pan is stuck, stand at the tabs on the casting corners and the use of a dull pry tool but be sure not to pry the gasket surface. For installation, the block and oil pan surfaces must be absolutely free from the previous sealant; if its removal is done with a scraper, it should not be pressed too hard to cut through the aluminum, and the mating surfaces should be wiped clean with lacquer thinner or acetone. Check that the threaded holes in the block are clearance and examination of the damage or blockage of the oil pump pick-up screen assembly. Place a new gasket on the oil pan, and then place the oil pan to the engine block, and install the screws in the right sequence according to torque. The balance of removal procedure is the converse of installation procedure; always add oil and fit new oil filter. If the oil pump has been replaced, it is advised to wait for about 20 minutes so as to allow the sealant to set before adding oil. Last but not least, join the battery, start the engine and examine the oil pressure as well as any oil leaks.


Related Honda Parts
 Honda Drain Plug Washer
 Honda Oil Filter
 Honda Drain Plug
 Honda Oil Pressure Switch
 Honda Rod Bearing
 Honda Dipstick
 Honda Oil Pump
 Honda Crankshaft Pulley
 Honda Dipstick Tube
 Honda Oil Cooler
 Honda Crankshaft Thrust Washer Set
Browse by Model
Accord Hybrid Oil Pan Accord Oil Pan Civic Hybrid Oil Pan Civic Oil Pan Clarity Plug-In Hybrid Oil Pan CR-V Hybrid Oil Pan CR-V Oil Pan CR-Z Oil Pan Crosstour Oil Pan CRX Oil Pan Del Sol Oil Pan Element Oil Pan Fit Oil Pan HR-V Oil Pan Insight Oil Pan Odyssey Oil Pan Passport Oil Pan Pilot Oil Pan Prelude Oil Pan Ridgeline Oil Pan S2000 Oil Pan