×
- Hello
- Login or Register
- Quick Links
- Live Chat
- Track Order
- Parts Availability
- RMA
- Help Center
- Contact Us
- Shop for
- Honda Parts
- Honda Accessories
My Garage
My Account
Cart
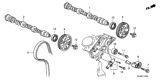
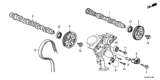
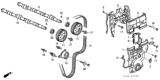
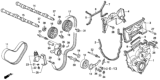
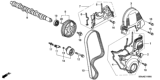
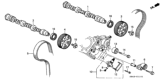
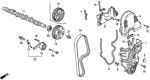
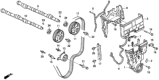
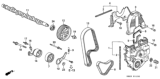
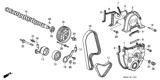
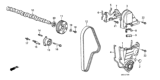
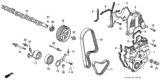
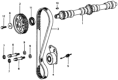
Genuine Honda Timing Belt
Engine Timing Belt- Select Vehicle by Model
- Select Vehicle by VIN
Select Vehicle by Model
orMake
Model
Year
Select Vehicle by VIN
For the most accurate results, select vehicle by your VIN (Vehicle Identification Number).
35 Timing Belts found


Honda Belt, Timing (197Yu20 Ve-501) (Unitta)
Part Number: 14400-RCA-A01$124.77 MSRP: $182.42You Save: $57.65 (32%)Product Specifications- Other Name: Timing Belt


 Product Specifications
- Other Name: Timing Belt


 Product Specifications
- Other Name: Timing Belt
- Replaces: 14400-PR4-A01


Honda Belt, Balancer Timing (Unitta)
Part Number: 13405-PT0-004$90.36 MSRP: $127.63You Save: $37.27 (30%)Product Specifications- Other Name: Timing Belt; Belt


Honda Belt, Timing (104Ru22 Gb-333)
Part Number: 14400-PMM-A02$95.05 MSRP: $134.25You Save: $39.20 (30%)Product Specifications- Other Name: Timing Belt
- Replaces: 14400-PMM-A01, 14400-PLM-004, 14400-PLM-014


Honda Belt, Timing (197Yu26 Gb-323)
Part Number: 14400-P8A-A02$121.15 MSRP: $177.12You Save: $55.97 (32%)Product Specifications- Other Name: Timing Belt
- Replaces: 14400-P8A-A01, 14400-P8F-A01


Honda Belt, Timing (104Ru24 Gb-333)
Part Number: 14400-P2F-A01$95.05 MSRP: $134.25You Save: $39.20 (30%)Product Specifications- Other Name: Timing Belt
- Replaces: 14400-P2E-004


Honda Belt, Timing (124Ru26 D-130) (Unitta)
Part Number: 14400-P2T-004$97.90 MSRP: $138.28You Save: $40.38 (30%)Product Specifications- Other Name: Timing Belt
- Replaces: 14400-PR3-004


Honda Belt, Timing (155Yu24 A-555)
Part Number: 14400-P13-014$97.92 MSRP: $138.30You Save: $40.38 (30%)Product Specifications- Other Name: Timing Belt
- Replaces: 14400-P13-004


Honda Belt, Timing (112Ru24 A-555)
Part Number: 14400-PAA-A02$95.40 MSRP: $138.27You Save: $42.87 (31%)Product Specifications- Other Name: Timing Belt
- Replaces: 14400-PAA-A01


Honda Belt, Timing (113Ru24 A-555) (Unitta)
Part Number: 14400-PT0-004$97.92 MSRP: $138.30You Save: $40.38 (30%)Product Specifications- Other Name: Timing Belt


Honda Belt, Balancer Timing (70Ru16 Gb-333) (Gates)
Part Number: 13405-PAA-A03$33.15 MSRP: $46.82You Save: $13.67 (30%)Product Specifications- Other Name: Timing Belt; Belt
- Replaces: 13405-PAA-A01, 13405-PAA-A02


Honda Belt, Timing (106Ru24 A-555)
Part Number: 14400-PM3-004$97.93 MSRP: $138.32You Save: $40.39 (30%)Product Specifications- Other Name: Timing Belt


Honda Belt, Timing (112Ru24 D-100) (Unitta)
Part Number: 14400-P0A-004$97.89 MSRP: $138.27You Save: $40.38 (30%)Product Specifications- Other Name: Timing Belt

 Product Specifications
- Replaced by: 14400-P2T-004


Honda Belt, Timing (104Ru22 Gb-333)
Part Number: 14400-PMM-A01$95.05 MSRP: $134.25You Save: $39.20 (30%)Product Specifications- Replaced by: 14400-PMM-A02

 Product Specifications
- Other Name: Timing Belt
- Replaces: 8-94174-306-0

 Product Specifications
- Replaces: 14400-634-003, 14400-634-004


| Page 1 of 2 |Next >
1-20 of 35 Results
About Honda Timing Belt
Your Honda timing belt is a delicate part which has some of the most important tasks in a running motor which is keeping the crankshaft and camshaft or camshafts with each other in perfect time, and in doing so the pistons and valves run in sync together and they will properly open and close in the correct positions. Unlike a timing chain which is manufactured out of metal, a timing belt is made out of an extremely tough and flexible rubber which has excellent longevity to be able to keep your engine safely running for many years to come.
The timing belt will be mounted to the water pump and camshafts in your engine bay. Replacing the timing belt properly can be a sensitive task, and should only be reserved for experienced DIYers and professional technicians. Because the belt is so closely related to the engine, your engine valves can give out if your timing belt does the same. Subsequently your engine will run very poorly, making loud valve noises which can eventually lead to piston damage as well. Don't wait until it is too late! The normal maintenance schedule to change your timing belt varies between every 60,000 and 105,000 miles.
HondaPartsNow.com is your source for a complete selection of OEM Honda parts and accessories online at competitive prices. There are several places online to find parts online, so why choose us? Firstly, we offer you an unbeatable price, and the number showing to you on the website is up to 36% off MSRP, and it is such a great deal for you to save money and get a genuine Honda part. All parts here are guaranteed to be brand new and in a high specification. Also, behind the computer screen, there is a team of dedicated customer service associates. What are you waiting for?
Honda Timing Belt Parts Questions & Experts Answers
- Q: How to remove and install Timing Belt on 3.2L V6 engine on Honda Passport?A:These engines are "interference" engines and if the timing belt goes, then the valves or pistons will be damaged. The timing system is somewhat complicated and any mistake has the potential to severely harm the engine, thus this procedure should only be done by experienced personnel. This is especially important if one is not very sure of one's abilities in the tasks required for the mastery of the skill. First unplug the cable from the negative terminal of the battery, and then remove the air cleaner duct as well as housing for 1998 and later models. Then, pull off the crankshaft pulley, the drivebelt(s) and the spark plugs, the engine cooling fan, as well as the fan shroud. Remove the fan by removing one bolt and two nuts from the pulley support. For 97 and earlier models, unhook the oil cooler line; for 98 and later models, take out the power steering pump. Take off the timing belt covers, as are the bolts of different types and measures for further installation. Start to turn the engine until the groove on the crankshaft sprocket is in line with the horizontal mark on the oil pump body while the camshaft sprockets are in position with the two marks facing each other. Liberate tension that is put on the timing belt by loosening the tensioner then, proceed and take the belt. Check the timing belt for signs of cracking, delaminated or wear and if it is worn, then replace it. Prior to starting the engine turn the crankshaft at least two full turns and feel for any drag that will tell you about the valves and the pistons. For 1998 and later models set the camshafts to the proper phase with the crankshaft turned clockwise and lined up with the sprockets. Before installation of the timing belt you need to release the hydraulic tensioner and to make sure that all the sprockets are correctly aligned. First of all, put the belt on the crankshaft sprocket with the outside writing and with the arrows facing clockwise. Pass the belt on the idler pulley and further round the camshaft sprockets making sure that the marks match. Hydraulic tensioner is then fitted and a slight rotation of the crankshaft is made then the hydraulic tensioner does the rest of the work. Twist the crankshaft counterclockwise and anticlockwise two full rotations and feeling for any level of resistance. Last of all, follow the steps that were mentioned for removal but in the reverse order.


