×
- Hello
- Login or Register
- Quick Links
- Live Chat
- Track Order
- Parts Availability
- RMA
- Help Center
- Contact Us
- Shop for
- Honda Parts
- Honda Accessories
My Garage
My Account
Cart
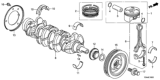
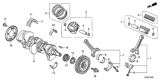
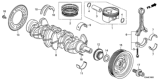
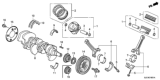
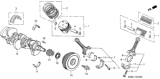
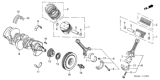
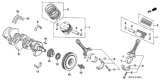
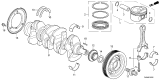
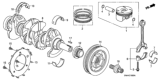
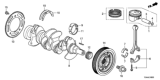
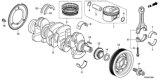
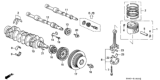
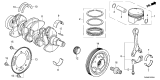
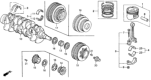
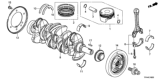
Genuine Honda Crankshaft
Crank Shaft- Select Vehicle by Model
- Select Vehicle by VIN
Select Vehicle by Model
orMake
Model
Year
Select Vehicle by VIN
For the most accurate results, select vehicle by your VIN (Vehicle Identification Number).
94 Crankshafts found


 Product Specifications
- Replaces: 13310-PPA-000


 Product Specifications
- Replaced by: 13310-RPY-G10


 Product Specifications
- Replaced by: 13310-5J6-A10


 Product Specifications
- Replaces: 13310-5A2-A00


 Product Specifications
- Replaces: 13310-R70-A10, 13310-R70-A00


 Product Specifications
- Replaces: 13310-RCA-A00


 Product Specifications
- Replaces: 13310-RDJ-A01


 Product Specifications
- Other Name: Crankshaft
- Replaces: 13310-RPY-G00


 Product Specifications
- Other Name: Crankshaft

 Product Specifications
- Other Name: Crankshaft

 Product Specifications
- Other Name: Crankshaft
- Replaces: 13310-5BA-A20

 Product Specifications
- Replaces: 13310-PAA-A00, 13310-PEA-000

 Product Specifications
- Replaces: 13310-64C-H00

 Product Specifications
- Replaced by: 13300-PM3-305


 Product Specifications
- Other Name: Crankshaft
- Replaces: 13310-5AA-A00


 Product Specifications
- Other Name: Crankshaft
- Replaced by: 13310-59B-J00
| Page 1 of 5 |Next >
1-20 of 94 Results
About Honda Crankshaft
A Honda Crankshaft needs to be kept in good working condition in your vehicle. The online catalog we provide will get you through the ordering process safely and securely. All genuine Honda Crankshafts from us are shipped directly from authorized Honda Dealer. If you want search for Honda Crankshaft fast and easily, just come to Hondapartsnow.com to look for your parts.
Honda Crankshaft Parts Questions & Experts Answers
- Q: What steps should be followed to remove the crankshaft after the flywheel and other components have been taken out on Honda Del Sol?A:It's assumed the flywheel or driveplate, crankshaft vibration damper, timing belt, oil pan, oil pump, and piston/connecting rod assemblies have already been removed. The rear main oil seal housing must be unbolted and separated from the block before proceeding with crankshaft removal. Before removing the crankshaft, check the endplay by mounting a dial indicator with the stem in line with the crankshaft and touching one of the crank throws. Push the crankshaft all the way to the rear and zero the dial indicator, then pry the crankshaft to the front as far as possible and check the reading on the dial indicator; the distance it moves is the endplay. If it's greater than specified, check the crankshaft thrust surfaces for wear, and if no wear is evident, new main bearings should correct the endplay. If a dial indicator isn't available, feeler gauges can be used by gently prying or pushing the crankshaft all the way to the front of the engine and slipping feeler gauges between the crankshaft and the front face of the thrust main bearing to determine the clearance. Loosen the main bearing cap bridge bolts 1/4-turn at a time until they can be removed by hand, using the opposite order of the tightening sequence, and note if any stud bolts are used to ensure they are returned to their original locations when reinstalling the crankshaft. Gently tap the bridge with a soft-face hammer, then separate the assembly from the engine block, using a large screwdriver as a lever if necessary, while trying not to drop the bearing inserts if they come out with the bridge. Carefully lift the crankshaft out of the engine, ideally with the help of an assistant due to its weight, and with the bearing inserts in place in the engine block and main bearing caps, return the caps to their respective locations on the engine block and tighten the bolts finger tight.
- Q: What steps must be taken to remove the crankshaft after it has been taken out on Honda Passport?A:The crankshaft can only be removed when the engine is removed from the vehicle; cautious, the following parts must be removedflywheel/driveplate, crankshaft damper/pulley, timing chain or belt, oil pan, oil pick-up, oil pump, front cover, and piston/connecting rod assemblies. Before the crankshaft can be pulled the rear main oil seal retainer must be removed as well as the bolts that secure the block. But first, make sure the endplay is correct; install a dial indicator, with the stem perpendicular to the crankshaft and touching the crank throw. Position the crankshaft to the rear and set the dial indicator to zero and then force the crankshaft to the front and read the indicator; the movement referred as endplay and should be adjusted using new main or thrust bearings if it exceeds standard measurements. In case a dial indicator is not available, feeler gauges can be applied in the following manner: one has to force the crankshaft forward and then turn it into the front direction and then use the feeler gauge to measure the space that is between the crankshaft and the thrust main bearing-this is the third one. Check that main bearing caps are identified for position from front to rear with progressive numbering and if not number them as required. Start on the main bearing cap bolts and rotate them to the point that they can be alternately unscrewed by hand the sequence of which is as follows; four-cylinder and v/6 engines. Tap with a soft-face hammer on the capings till they come off from the engine block for which the bolts can be used as levers. Finally, very gently lift the crankshaft out of the engine and with bearing inserts set back in place insert the steel caps back to the block with analyzing bearing upgrades & dynanmic squaring the head tighten the bolts only to finger tight.


Related Honda Parts
 Honda Rod Bearing
 Honda Oil Pan
 Honda Oil Pump
 Honda Oil Pan Gasket
 Honda Crankshaft Pulley
 Honda Camshaft
 Honda Cam Gear
 Honda Crankshaft Thrust Washer Set
 Honda Crankshaft Gear
Browse by Model
Accord Crankshaft Accord Hybrid Crankshaft Civic Crankshaft Civic Hybrid Crankshaft Clarity Plug-In Hybrid Crankshaft CR-V Crankshaft CR-V Hybrid Crankshaft CR-Z Crankshaft Crosstour Crankshaft CRX Crankshaft Del Sol Crankshaft Element Crankshaft Fit Crankshaft HR-V Crankshaft Insight Crankshaft Odyssey Crankshaft Passport Crankshaft Pilot Crankshaft Prelude Crankshaft Ridgeline Crankshaft S2000 Crankshaft