×
- Hello
- Login or Register
- Quick Links
- Live Chat
- Track Order
- Parts Availability
- RMA
- Help Center
- Contact Us
- Shop for
- Honda Parts
- Honda Accessories
My Garage
My Account
Cart
Genuine Honda CRX Rack And Pinion
Steering Rack And Pinion- Select Vehicle by Model
- Select Vehicle by VIN
Select Vehicle by Model
orMake
Model
Year
Select Vehicle by VIN
For the most accurate results, select vehicle by your VIN (Vehicle Identification Number).
13 Rack And Pinions found

Honda CRX Box, Steering Gear (Yamada)
Part Number: 53040-SB2-737$576.16 MSRP: $831.41You Save: $255.25 (31%)

Honda CRX Rack And Pinion
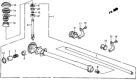
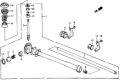
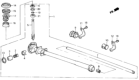
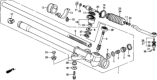
The Steering Rack in the Honda CRX model is crucial determinations since it transforms the rotational movement from the steer wheel to lateral movement of the front wheels for proper control of the vehicle's course. Usually, this mechanism uses rack and pinion model, in which the pinion is connected to the steering column while the rack is positioned inside a metal tubing. The operation of the rack is made easier by the hydraulic power assist which employs the use of compressed fluid to make the process easier. Since the early models of the Honda CRX up to later models of the automobile employ hydraulic power rack and pinion systems as the most vital feature in steering responsiveness as opposed to the conventional manual steering systems. Straight gears, because of their high efficiency and low operating temperatures are normally used, but helical gears may also be utilized with some negative impacts as wear. This involves checking often on the condition of the Steering Rack since fluid leakage or some worn out parts in the Honda CRX cause difficult in steering.
In search of affordable OEM Honda CRX Rack And Pinion? Consider browsing through our extensive inventory of genuine Honda CRX Rack And Pinion. Not only do we provide market-leading prices and a manufacturer's warranty, but we also pride ourselves on exceptional customer service and swift delivery.
Honda CRX Rack And Pinion Parts Questions & Experts Answers
- Q: How to Raise, Support, and Adjust the Rack and Pinion on a Honda CRX?A:Support the vehicle and raise it, then turn the Steering Wheel using a suitable spring gauge and check the reading and if it's greater than 3.3lbs. adjust the steering gear as outlined. Put front wheels in straight ahead position, loosen rack screw locknut, check for tight or loose steering throughout the complete turning travel and recheck steering effort. Ensure that toe play is less than 0.4 in. (10mm) and lower the vehicle and measure the distance the steering wheel can be turned without moving the front wheels. If that distance exceeds 0.4 in. (10mm), check all steering components. Raise the vehicle and support it, remove the cover panel and steering joint cover, unbolt and separate the steering shaft at the coupling; remove the front wheels. Using a ball joint tool disconnect the Tie Rod Ends and remove the cotter pins, loosen the castle nuts and lift out of the Steering Knuckles. For manual transaxle, remove the shift lever torque rod by disconnecting the shift lever from the clutch housing, slide the pin retainer out of the way, drive out the spring pin; remove shift rod if equipped with automatic transaxles, remove the shift cable guide from the floor and pull the shift cable down manually. Remove the two nuts from the exhaust header pipe and exhaust pipe and move the exhaust pipe out of the way. Pull the rack over to far right and remove the brackets or mounting bolts, then push the tie rod ends to the right until they sit as far away from the shock as possible. Lower the rack far enough so that you can pull the end of the pinion shaft out of the hole in the frame channel and rotate it forward, so that it's coming out rearward. Using it to slide the axle rack to the right so the left tie rod passes over the exhaust pipe; then drop it down and out of the vehicle to the left. To install, position rack into vehicle, torque mounting bolts to 29 lbs (40 Nm), connect exhaust pipe with new gasket, reconnect shift linkage and tension as required, install tie rod ends into steering knuckle, torque nuts to 32 ft. lbs (44 Nm), then tighten as required to install new cotter pin and connect steering shaft coupling, torquing bolt to 22 ft. lbs (30 Nm). To overhaul, pull the bellows (at each end of the rack), loosen band that retains bellows on rack, remove rack (rack and pinion) from vehicle, and support rack (rack and pinion) in bench vise. To remove the tie rods on the end of the rack use a 17mm wrench to remove the tie rods, and a 22mm wrench to hold the rack. Carefully remove the lock nut securing the rack guide components and remove the pieces from the rack body, but not the spring. Remove the pinion assemby dust seal and remove the snapring that holds the pinion assembly and withdraw the pinion through the gearbox body sliding the rack out of the the gearbox body, remove the snapring that holds the pinion assembly. Inspect the pinion assembly for wear, scoring or damaged teeth, replacing if needed. Freedom to move the pinion bearing, and any indication of balls damaged should be inspected; if there is a damaged ball in the pinion bearing, the pinion assembly must be replaced. The rack is inspected to determine if it has excessive wear or damaged teeth (if so it is replaced) and the rack guide is checked for scoring and the steering gear housing for cracking or damage to the pinion bore. Apply a thin coat of grease to the rack end bushing and install as shown in Figure 6. Carefully slick the rack with grease and slide into the housing so as not to damage the housing surface. Install the pinion assembly into the housing and the 35mm snapring to hold the pinion, and then the pinion dust seal. Install rack guide components into housing; if required, adjust rack guide screw after rack installation, and grease rack guide. Place each of the tie rods into the rack and screw in while holding the lock washer to get the tabs of the lock washer aligned in the slots of the rack, set in the stopper washer with with the chamfered side facing out, tighten the tie rod well and bend the lock washer back on to the flange. Install the bellows over the end of the rack housing and the retaining clamp, install the tie rod ends on the tie rods filling the tie rod boots with grease, then install the rack into the vehicle and adjust.
")


