×
- Hello
- Login or Register
- Quick Links
- Live Chat
- Track Order
- Parts Availability
- RMA
- Help Center
- Contact Us
- Shop for
- Honda Parts
- Honda Accessories
My Garage
My Account
Cart
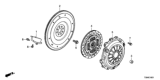
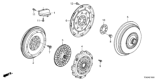
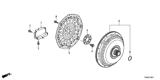
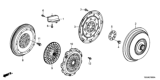
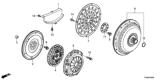
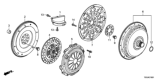
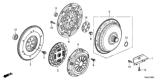
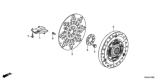
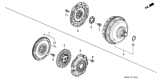
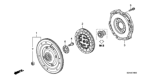
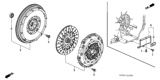
Genuine Honda Flywheel
Clutch Flywheel- Select Vehicle by Model
- Select Vehicle by VIN
Select Vehicle by Model
orMake
Model
Year
Select Vehicle by VIN
For the most accurate results, select vehicle by your VIN (Vehicle Identification Number).
169 Flywheels found


 Product Specifications
- Other Name: Flywheel
- Replaces: 22100-5DE-003


 Product Specifications
- Replaces: 22100-5CD-008


 Product Specifications
- Other Name: Flywheel


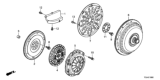


 Product Specifications
- Replaces: 22100-PRB-003


 Product Specifications
- Other Name: Flywheel
- Replaces: 22000-5Y4-003, 22000-6D3-003


| Page 1 of 9 |Next >
1-20 of 169 Results
About Honda Flywheel
To keep your vehicle parts in good shape, you have to understand their function. A flywheel is basically like a battery. If you charge a battery for too long or overload it, it may explode. It converts the engine's kinetic energy into potential energy and stores it. So you should regularly check the Honda flywheel's body for damage. And if you want change your flywheels, our website is your best choice.
Honda Flywheel Parts Questions & Experts Answers
- Q: How to remove and reinstall a transaxle and flywheel/driveplate on Honda Fit?A:To do the above, one has to lift the vehicle on jack stands, then disconnect the required transaxle. For models with a manual transaxle, remove the pressure plate and the clutch disc and it might be wise to inspect or replace the clutch parts and pilot bearing at this time. Next, you need to take out the bolts which fix the flywheel/driveplate to the crankshaft, but be careful not to let the crankshaft rotate this is can be done by using a small screwdriver or a long punch . Gently unscrew the flywheel/ driveplate and, while doing this ensure that you hold it up because, at this point, it is rather heavy. Remove the grease and the oil from the flywheel and check it for cracks, rivet grooves, burned areas, and score marks, but the light scoring may be eliminated by use of emery cloth. One has to inspect if there is any crack or breakage on the ring gear teeth then ensure that the flywheel is even on the straight edge. Ensure that the mating surfaces of the flywheel/driveplate and crankshaft area cleaned and inspected and the r.m.o. seal if leaking is replaced before refitting. If required measure the flywheel runout and if it is not within the limit or if there are deep wear grooves, take the flywheel to a machine shop for resurfacing. To fit the flywheel/driveplate onto the crankshaft ensure that dowel pin holes of flywheel/driveplate aligns with crankshaft and if there are spilt bolt holes then ensure that they are also aligned, apply thread-locking compound on the bolts and then tighten them evenly in an X pattern. The end of the installation shall be done using the principles of the removal process in reverse.
- Q: How to remove and install a flywheel or driveplate on 2.3L and 2.6L four cylinder engine on Honda Passport?A:If the engine is in the vehicle, remove the clutch cover and clutch disc, or the automatic transmission. Flatten the lockplate tabs if used and remove the bolts that secure the flywheel/driveplate to the crankshaft rear flange, being cautious as the flywheel is very heavy and shouldn't be dropped. If the crankshaft turns while loosening the bolts, wedge a screwdriver in the starter ring gear teeth to prevent the flywheel from turning. Detach the flywheel/driveplate from the crankshaft flange and unbolt the engine rear plate, checking the engine block rear core plug for leakage. If the teeth on the flywheel/driveplate starter ring gear are badly worn or missing, install a new flywheel or driveplate. Clean the mating surfaces before installing the flywheel/driveplate, and if removed, reinstall the engine rear plate. Position the flywheel/driveplate against the crankshaft using a new spacer if equipped, and insert the mounting bolts with Loctite 262. Ensure the crankshaft/flywheel bolts are properly sealed to prevent oil leaks, then tighten the bolts in a criss-cross pattern to the specified torque. The remainder of the installation follows the reverse order of removal.


Related Honda Parts
 Honda Torque Converter
 Honda Wheel Stud
 Honda Lug Nuts
 Honda Axle Shaft
 Honda Wheel Bearing
 Honda Shift Cable
 Honda Drive Shaft
 Honda Wheel Hub
 Honda Transmission Assembly
 Honda Transfer Case
 Honda Shift Indicator
 Honda Speedometer Cable
Browse by Model
Accord Flywheel Accord Hybrid Flywheel Civic Flywheel Civic Hybrid Flywheel Clarity Plug-In Hybrid Flywheel CR-V Flywheel CR-V Hybrid Flywheel CR-Z Flywheel Crosstour Flywheel CRX Flywheel Del Sol Flywheel Element Flywheel Fit EV Flywheel Fit Flywheel HR-V Flywheel Insight Flywheel Odyssey Flywheel Passport Flywheel Pilot Flywheel Prelude Flywheel Ridgeline Flywheel S2000 Flywheel